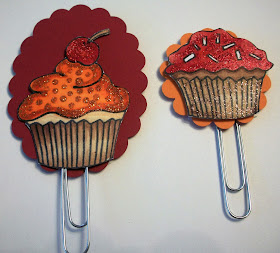
Hi Friends, Deonna Here with my R.I. Project of the week. I'm going to show you how to make
Stamped Paperclip bookmarks
Supplies used
Repeat Impressions stamps- 9302-P, Cupcakes
Black Archival Ink
Copic Markers
Paper Clips
Scissors
Foam Tape
Marvy Uchida punch- Large Oval
Stampin'up Scalloped Circle punch
Cardstock: White, Orange,Red
1. Using your Stamps, Archival ink and Cupcake Stamps: Stamp 2 of each of the cupcakes onto White Cardstock
2. Color each Cupcake with desired Medium- I colored mine with copic Markers.
3. Add Glitter Glue where desired on the cupcake and allow to dry..
4. Fussy cut each cupcake image out with scissors.
5. Cut Small pieces of the foam tape and place on the backside of each of the cupcakes like shown. You may also want to add some hot glue to the backside to make sure that the cupcake it completely adhered.
6. Use your punches to punch out a scalloped circle with the Orange cardstock and a Scalloped oval with the Red Cardstock. Remove the backing from your foam tape and place the die cut shape onto the foam tape over the top part of the paperclip.
8. Finished project
Stamped Paperclip bookmarks
Supplies used
Repeat Impressions stamps- 9302-P, Cupcakes
Black Archival Ink
Copic Markers
Paper Clips
Scissors
Foam Tape
Marvy Uchida punch- Large Oval
Stampin'up Scalloped Circle punch
Cardstock: White, Orange,Red
1. Using your Stamps, Archival ink and Cupcake Stamps: Stamp 2 of each of the cupcakes onto White Cardstock
2. Color each Cupcake with desired Medium- I colored mine with copic Markers.
3. Add Glitter Glue where desired on the cupcake and allow to dry..
4. Fussy cut each cupcake image out with scissors.
5. Cut Small pieces of the foam tape and place on the backside of each of the cupcakes like shown. You may also want to add some hot glue to the backside to make sure that the cupcake it completely adhered.
6. Use your punches to punch out a scalloped circle with the Orange cardstock and a Scalloped oval with the Red Cardstock. Remove the backing from your foam tape and place the die cut shape onto the foam tape over the top part of the paperclip.
7. So now you should have a sandwich with the Cupcake, paperclip, foam tape, then the punched scalloped oval or circle. Add more foam tape to the second image and attach to the backside of the scalloped oval or circle.
8. Finished project
Challenges
Jo's Scrap Shack #154 Anything goes (3/3)
PDE linky #136 Anything goes (3/3)
Craft Rocket #23 Anything goes (3/3)
Crafting with an attitude #19 Anything goes (3/3)
DL Art September Anything goes 1 ea. day
Sunny Day Crafting #12 Anything goes
Crafting by Designs Sept. Anything goes (3/3)
Inspiration Destination #101 Anything goes
613 Avenue #189 ATG with Colors of Fall (1/3)
Lil Patch of Crafty Friends #41 Anything goes (1/3)
Robyn's Fetish #332 Food or Drink
Have a great week!


What a wonderful post, thanks for joining us at Craft Rocket, xxx
ReplyDeleteDeonna this is such a fun project. Love the bookmarks.
ReplyDeleteThis will also be perfect for one entry as an anything goes creation for our challenge below.
Hugs
Desíre
{ATG with a CREATE WITH TLC Element}
{Doing Life – my personal blog}
Love these! Thank you so much for the tutorial and progress pictures. I always wondered how people make these things, and now I know! Thanks for linking up at Sunny Day Crafting.
ReplyDelete~DT Janis
Yum, those cupcakes look good enough to eat. Thanks for joining in the fun at 613 Avenue Create
ReplyDeleteLorraine DT
Thanks for linking up at PDE Linky Party.
ReplyDelete~DT Janis
Thanks for joining our Fun-Day Friday Challenge @ Jo’s Scrap Shack.
ReplyDeleteWhat a lovely project! Thanks for playing with us at Crafting with an Attitude :) xx Mari
ReplyDeleteOh these are so stinking cute!!! Thank you for the step by step tutorial on how you created these! I really love tutorials and I think they are a great stepping stone for anyone to recreate a project or to at least spark up an idea for a new project! These turned out beautiful! Thank you so much for joining us this week at Jo's Scrap Shack for our Funday Friday challenge!
ReplyDeleteHugs,
Jo-owner
♥ Jo's Scrap Shack ♥
Thanks for the lovely project and the great step-by-step tutorial! Thanks for Rocking with us this week at 613 Avenue Create!
ReplyDeleteHugz,
Chana Malkah Harris, Owner
Oh these are so cute and so fun! Thanks so much for sharing how you made them. Thanks for joining Fun~day Friday at Jo's Scrap Shack.
ReplyDeleteJoyce
www.JoycesCreativeCrafts.blogspot.com
great tutorial and project.I love the tip of covering the back with punched circles - saves trying to match up a duplicate image
ReplyDeleteWhat a cute design.Love all the fantastic details. Thanks so much for your entry in our monthly challenge at 613 Avenue Create!
ReplyDeleteWow! Thank you so much for sharig this tutorial with us at 613 Avenue Create! It is so inspiring! I definately have to try this!
ReplyDeleteSasha