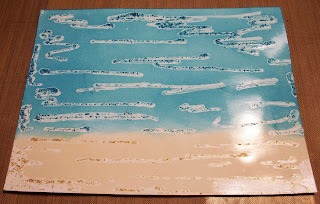
Hi Everyone, Deonna here with the Repeat Impressions project of the week. I've chosen to show you how to make a Distressed Stickles Resist Background today. It is so easy and i just love the results. See what you think.
Supplies that you will need:
Stickles in the colors that you want to use- I'm using Broken China and Antique Linen.
Glossy Cardstock- mine is Ranger, any will work fine
Distress inks- Broken China and Antique Linen
Blending Tool
Black Archival ink by Ranger
Stamps- Repeat Impressions- 5120-K, Palm Frond Sil. (lg), 2408-N, Large Palm Trees, Sentiment-
Step 1- Gather Supplies and Cut your cardstock to the size you want your card to be. I'm making a 5 1/2" x 4 1/4" inch card.
Step 2- Place glitter glue over the area that you want the ink to resist. Allow to Dry. You can heat set this if you own a heat tool.
Step 3- Taking your Distress inks and distress tool, ink the areas that you want colored in a circular motion until desired color. I used Broken china for my top 3/4 of the background and Antique linen for the bottom 1/4. Allow to dry or heat set.
Step 4- Using your Repeat Impression stamps, stamp the image on the cardstock with Black Archival ink. I wanted my Palm tree to be in the Sand and the Palm fronds to be around the outside of the card.
Complete your card by mounting, adding embellishments, or just stamping a sentiment.
So fun and So Easy! Have a great day!
Challenges
Challenges
Crafting with an Attitude #12 Anything goes (33)
Crafting by Designs Anything goes (3/3)
Inspiration Destination #71 Anything goes
Creative Card Crew #105 Anything goes
Addicted to Stamps #119 Anything with a Stamp (1/3)
Lil Patch of Crafty Friends #27 Anything goes (1/3)
Challenge up your life #34 No Designer papers 1-
Crafting with Dragonflies Any Card goes 1-
Hiding in my Craft Room #237 No pink or Red 1-
PDE Linky #109 Anything goes
I hope that you enjoy this tutorial and give it a try!


10 comments:
Gorgeous creation ,thank you for joining us at Addicted to Stamps challenges
hugs
laurigami
Great technique and very clear tute. Thank you for sharing this. Wyn DT Crafting with Dragonflies.
That looks wonderful. Thanks for joining us at PDE Linky Party.
Janis, Creator & DT Member
Pause Dream Enjoy
Paper Play Sketches, Creator & DT Member
PDE Linky Party, Creator & DT Member
Great technique and thanks for the tutorial. Love the effect created. Thanks for sharing this creation with us at Crafting with Dragonflies, Cheers Susan
Beautiful card. Love the stickles background technique. Thanks for joining the Crafting With An Attitude challenge.
Great technique! I have to try this! Thanks for making it a POTW.
Fabulous card Deonna! Thanks so much for the tutorial. I really appreciate you taking the time to tell us how you created this awesome background.
I am your newest follower and would love to have you follow my blog also.
Thanks so much for joining our Lil Patch of Crafty Friends Challenge. We hope to see you again in the next challenge. Good luck in the challenge. Hugs, Gloria DT
http://purpleglocreations.blogspot.com
This is gorgeous! Thanks so much for your lovely tutorial- I'm definitely going to have to try this! Thanks so much for joining us at PDE Linky Party! Hugs, DT Karla
wow---I love that!!!! I must try it! thank you for sharing, and thank you for joining us over on the HIMCR blog!
Love your technique.. Gorgeous card.. Thank you so much for sharing your gorgeous project with us at Lil Patch of Crafty Friends challenge #27.. Hope to see you again in our next challenge.. And good luck at the draw.. <3
hugs,
~RoRa
Post a Comment